Mastering The Mix Reference 3 costs £59 and compares your mix against reference tracks to suggest fixes.
Checking how your mix stacks up sonically alongside a reference track is one of the best ways to level up your productions. Whether you are at the writing stage and looking to calibrate your ears before you begin, or in the mixing or mastering phase, it is an essential technique for beginners and pros alike.
I have always found switching back and forth between tracks to be incredibly clunky inside a DAW, but dedicated plugins like Mastering The Mix’s Reference make it quick and easy. Version 3 adds new and innovative ways of comparing tracks and, although some of these give mixed results, the overall package provides a slick workflow and enough useful tools to make it all worthwhile.
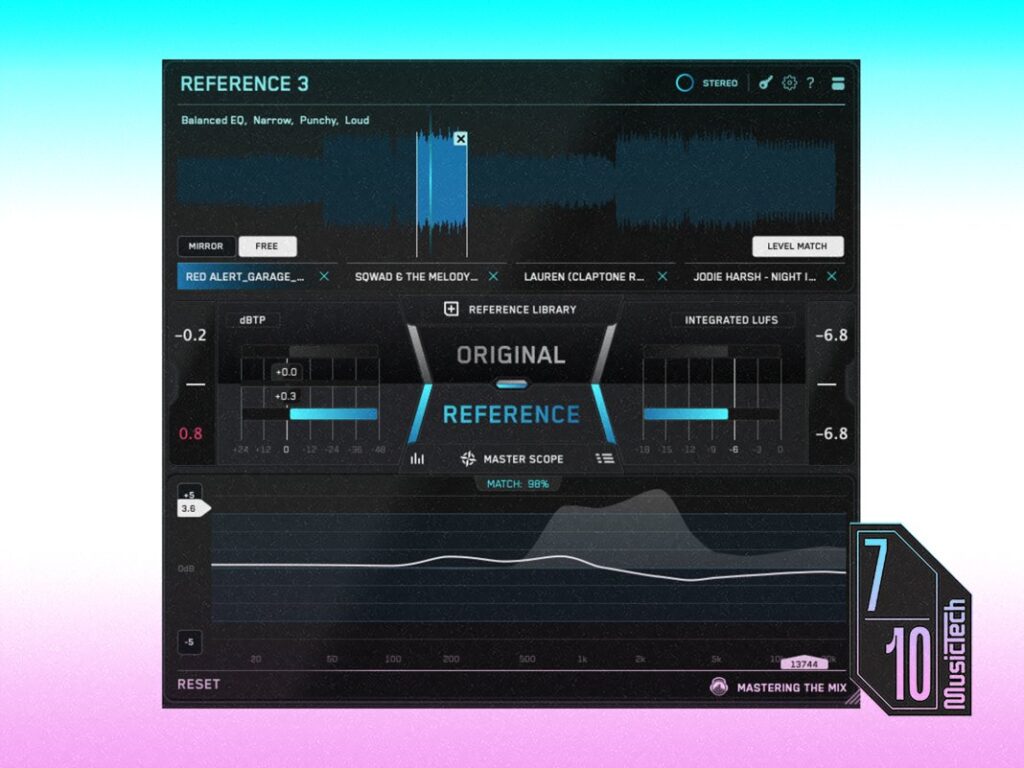
Learning to identify a useful and relevant reference track is an important skill. Even within the same genre there are differences in things like kick drum size, hi-hat sizzle, and vocal width — picking the wrong track can leave you chasing your tail. To help with this, Reference 3 includes an inventive feature that scans your reference track folder to give each track a series of unique tags according to the elements of tonal balance, stereo, dynamics and loudness. It then listens and analyses your track for 20 seconds and pulls up four tracks from your library that are the closest, giving each a match percentage score. A larger and broader reference library will give the best results, naturally.
Especially impressive is that the four tracks are instantly level matched to your track, with their loudest parts looped. More times than not, it provides me with useful selections that allow me to get started making comparisons straight away. When I disagree with any of the selections, then it is easy to switch them out with a track of my own choosing. You can also set up additional loops, or switch to Mirror mode, which is useful for checking different versions of the track that you are working on.
The centre of the user interface is where you click to switch between the original and the reference track, and it is flanked by peak and LUFS meters so you can compare volumes. Below this is a veritable smorgasbord of feedback data on how the mixes compare, including differences in the frequencies, width, compression, and instrument balance. The latter is an innovative new feature called Mix Balance. It reads the relative volumes of the vocals, drums, bass and musical elements of each reference, and then compares it to your own balance, offering suggestions of volume adjustments if they do not match.
Mix Balance can be heavy on the CPU and memory as it is calculating in real time, but it can be switched off in the settings menu. I find the resulting suggestions are sometimes inconsistent, and making the relevant adjustments is not always then reflected in the metering. That said, when I take it more as a rough starting point to make minor tweaks, I am able to overcome my ear fatigue from hearing a track too many times, and manage to create a slightly more balanced mix.
The next section is Master Scope, which has several meters that can be switched on and off. These include red areas that will show up if you have portions of your track that are seriously out of phase, and also if there is over-compression in a region compared to the reference. Both are useful indicators of potential problems, but it is also worth checking your mix in mono to make sure you are not losing anything important. I also found the Over Compression meter seemed reluctant to register anything in the low-frequency range, even when I compressed the master using an OTT compressor as a test.
Two returning features from the previous version are the Stereo Width display and the Level Line, novel alternatives to simply trying to match two spectral curves together. It shows the difference between the two tracks as the exact EQ adjustments needed to make your track sound like the reference. You can change the refresh speed in the settings, which helps slow things down and make it easier to read. The manual suggests that as long as you are within +/- 3dB, then you are sounding pretty close, and this is highlighted by a faint blue region behind the line. You get four levels of zoom that potentially let you really hone in on the small differences, but it is wiser to use the Level Line as a rough guide and work more zoomed out.
In principle, the Level Line is a more direct way to help you match your tracks than using a spectrum analyser, but it has the danger of leading you down the garden path of following numbers when you should be using your ears. I find myself making adjustments and expecting the line to match what I am doing, but it keeps recalibrating itself into different shapes as the built-in volume averaging system shifts the line up and down. It is not without its uses though. If you take the first shape it presents and roughly build that into an EQ curve, then you get part of the way there.
I am surprised to find the Stereo Width display to be the most useful to me. It shows how much you need to widen or narrow the mix at different parts of the spectrum, and the display seems to respond more predictably as you make changes in real time.
The final new section is the Mix Instructor, which essentially provides a text version of the meter readouts in the Master Scope display. It splits the spectrum into three bands and presents simple instructions like Boost by 2 dB. You could argue that using this is a safer idea than using the Level Line, as it works more generally without you obsessing over small, specific EQ shapes. However, it is also victim to some of the same unpredictability issues, so use with care.
Other useful features include the ability to quickly solo a portion of the spectrum to help compare subs or top end, being able to switch the output from Stereo to Mono, Mid or Side, and the extra Ref Send plugin. This little beauty can be placed at the beginning of your mastering chain and will send a signal to Reference 3 so that you can easily do level-matched comparisons of your master bus processing. There is even a guide on the Mastering The Mix website that shows how you can use it to route audio directly from music streaming services to compare to your tracks.
I am somewhat torn with Reference 3. It is arguably a victim of its own success at providing stacks of data for you to use when comparing tracks. When you see it providing specific width or EQ suggestions, it is easy to make decisions based on trying to balance numbers rather than actually using your ears. That is not necessarily the plugin’s fault though.
If you can build Reference 3 into your workflow as more of a guide than a verbatim solution, then it has stacks of useful tools and a lightning-fast workflow that could make it a decent contender.
Key features
- Referencing plugin (VST3, AU, AAX)
- Smart Reference Tracks feature automatically finds four similar tracks
- Tracks are auto-looped, level matched, and given concise mix descriptors
- Masterscope provides exact EQ and stereo width adjustments to match the reference
- Also highlights phase issues and over-compression
- Mix Balance feature suggests gain adjustments for vocals, drums, bass and music
- Mix Instructor splits into three bands and tells you exactly what is needed to match the reference
- Match % displays how closely the tonal balance, stereo, dynamics and loudness are matched